
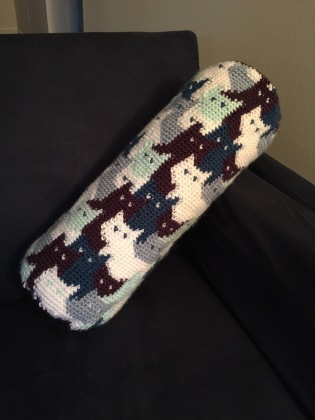
I love cats, so I wanted to make a scarf covered in cats, inspired by this blanket pattern (which was designed by Sandra Miller Maxfield and is sometimes available for free on various websites). I was almost at 2 feet long, when I realized this scarf was way too heavy and thick to be a scarf! A very clever friend of mine suggested that I make it into a pillow cover instead, and luckily I found the perfect pillow form for this purpose.
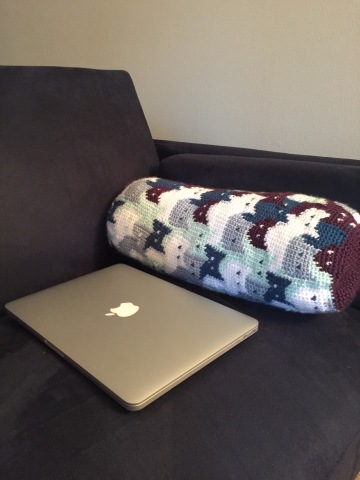
13″ laptop for scale.
Want to make your own cat pillow? Here’s how:
Materials:
- 5 skeins of worsted weight yarn in all different colors. I used Caron Simply Soft.
- H hook
- Yarn needle
- A ton of yarn bobbins! (~15 should be enough)
- Neck roll pillow form. I used this one.
Abbreviations:
- Ch = chain
- Sl = slip
- Sc = single crochet
Color changing tips:
- Use the next color for the final yarn over in the last sc of one color section.
- Carry the yarn behind the work, and pick it back up loosely in the next round.
- Use a separate bobbin of yarn for each cat.
- The eyes don’t require a bobbin. Just cut a piece of yarn about 6″ long.
- Use contrasting colors for the eyes.
Instructions:
Tube:
- Download the free chart from this blanket pattern.
- Assign one color for each of the 5 colors in the chart.
- Pick one color. Ch 80 in that color and join to make a big circle.
- Now you will start the pattern. Sc 1 for each square on the pattern, starting at the bottom of the chart and changing colors when necessary. (I started at the left because I prefer reading that way, but starting at the right is fine too.) You will repeat the pattern twice per round. At the end of the round, sl in first sc made.
- For the next round, use the next row up on the chart. Ch 1 and make the first new sc in the same sc as the ch you just made. Sc around, keeping with the color pattern. Sl in first sc made in this round.
- Repeat step 5 until the tube is the length of your pillow form.
- Fasten off.
- Turn the tube inside-out. Tie double knots between ends that are in close proximity together, until all ends have been fastened to another end. This is to prevent ends from becoming loose in your final product. Don’t pull too tight or the fabric won’t stretch enough. Turn the tube back the right way.
Circular ends (make 2 in any color):
- Sc 6 in magic ring (6)
- 2 sc in first sc, sc in next sc. Repeat around. (12)
- 2 sc in first sc, sc in next 2 sc. Repeat around. (18)
- 2 sc in first sc, sc in next 3 sc. Repeat around. (24)
- 2 sc in first sc, sc in next 4 sc. Repeat around. (30)
- 2 sc in first sc, sc in next 5 sc. Repeat around. (36)
- 2 sc in first sc, sc in next 6 sc. Repeat around. (42)
- 2 sc in first sc, sc in next 7 sc. Repeat around. (48)
- 2 sc in first sc, sc in next 8 sc. Repeat around. (54)
- 2 sc in first sc, sc in next 9 sc. Repeat around. (60)
- Sl 1 and fasten off.
Assembly:
- Insert the pillow form into the tube and tuck in any loose ends sticking out from the inside.
- Sew the circular ends on.
- Ta-da! Your cat pillow is done.
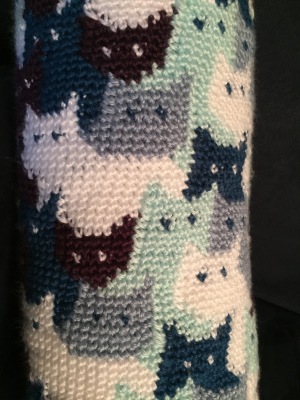
A closeup of the cats.
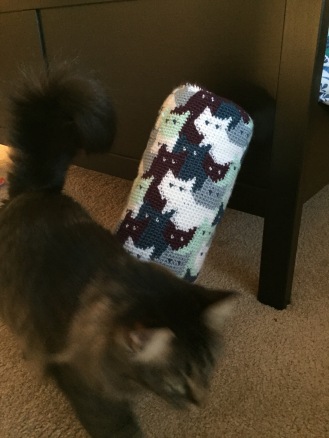
Cat for scale?


How do I buy one? Email me, please. Cundall8@gmail.com
LikeLike
Sorry, I am not selling these. I am pretty busy and this took quite a long time to make!
LikeLike
Nicely done! Now anyone who makes blanket can have a matching pillow (or a few!)
LikeLiked by 1 person
Purrrfect!!
LikeLike